

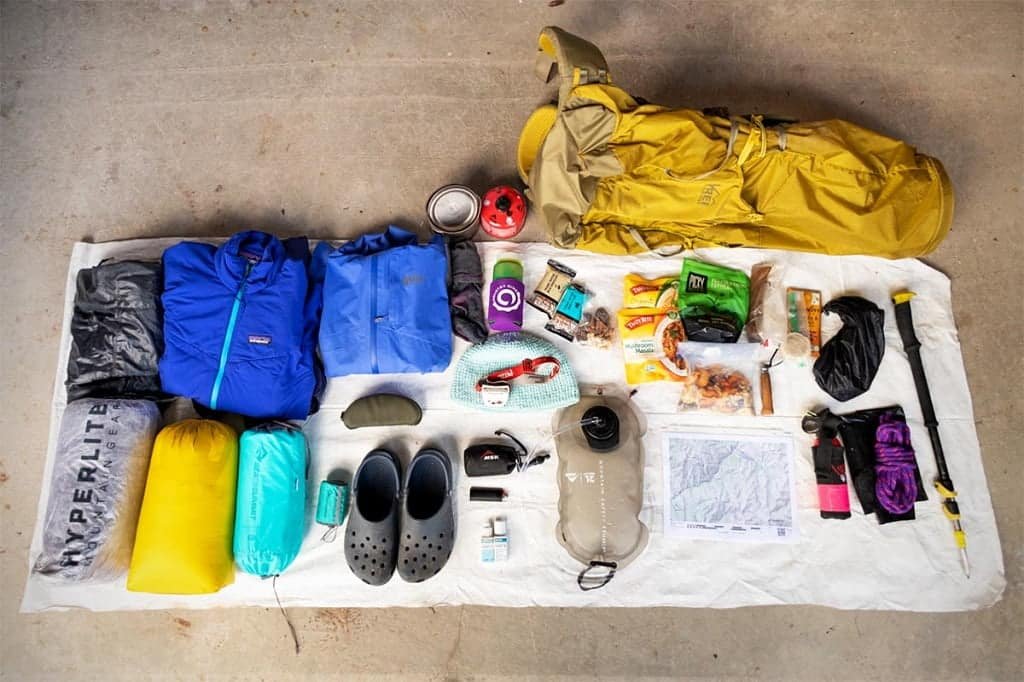
Hiking is more than just a physical journey; it’s a dance of endurance, nature, and preparation. One of the fundamental aspects of preparation is how to pack a backpack for Hiking. A well-packed backpack can mean the difference between a comfortable hike and a challenging one. It can influence your balance, your posture, and how often you need to stop and rearrange or search for items.
The importance of properly packing a backpack for hiking cannot be overstated. Just as you wouldn’t head out on a road trip without ensuring your car is packed efficiently, the same care must be applied to hiking. Your backpack is your lifeline. It contains all the essentials you’ll need to navigate, stay nourished, combat the elements, and handle emergencies.
The overarching objective of packing is threefold:
- Balance Weight to ensure comfort and reduce strain on your back.
- Accessibility to frequently used items to save time and energy.
- Necessity to ensure you have all essential items without overpacking.
Choosing the Right Backpack
Before you even begin packing, the first step is to choose the appropriate backpack for your hike. This will be the container for all your essentials, and its design and fit will largely influence your hiking experience.
Types of Backpacks:
- Daypacks: These are suitable for hikes that last just a day. They are compact, lightweight, and designed to carry essentials like water, snacks, a first-aid kit, and perhaps a light jacket.
- Multi-day Packs: As the name suggests, these are designed for treks that span several days. They have a larger capacity, and more compartments, and are often built to support heavier loads with features like padded hip belts.
Factors to Consider:
- Size: This refers to the actual volume of the backpack, typically measured in liters. A short day hike might only require a 20-30 liter pack, whereas a week-long expedition could demand 70 liters or more.
- Weight: An empty backpack shouldn’t be too heavy. Remember, every ounce counts, especially when you’re carrying it for miles.
- Capacity: Ensure the backpack can hold all your necessities without straining the zippers or seams.
- Features: Some backpacks come with hydration reservoirs, rain covers, multiple access points, or even detachable daypacks. Consider what features will be most beneficial for your hike.
Fitting the Backpack:
Lastly, but most importantly, the backpack should fit well. A snug fit ensures that the weight is distributed evenly across your back and hips, reducing the risk of strain or injury. When trying on a backpack:
- Load it with weight to mimic a real hike.
- Adjust all the straps – shoulders, chest, and hips.
- Walk around, bend, or even simulate hiking movements to see if it remains comfortable and stable.
Remember, a well-chosen backpack not only carries your essentials but also supports your journey, ensuring that every step on the trail is a step taken in comfort and confidence.
Read More: Embarking on Epic Backpacking Adventures
The Three Zones of Packing
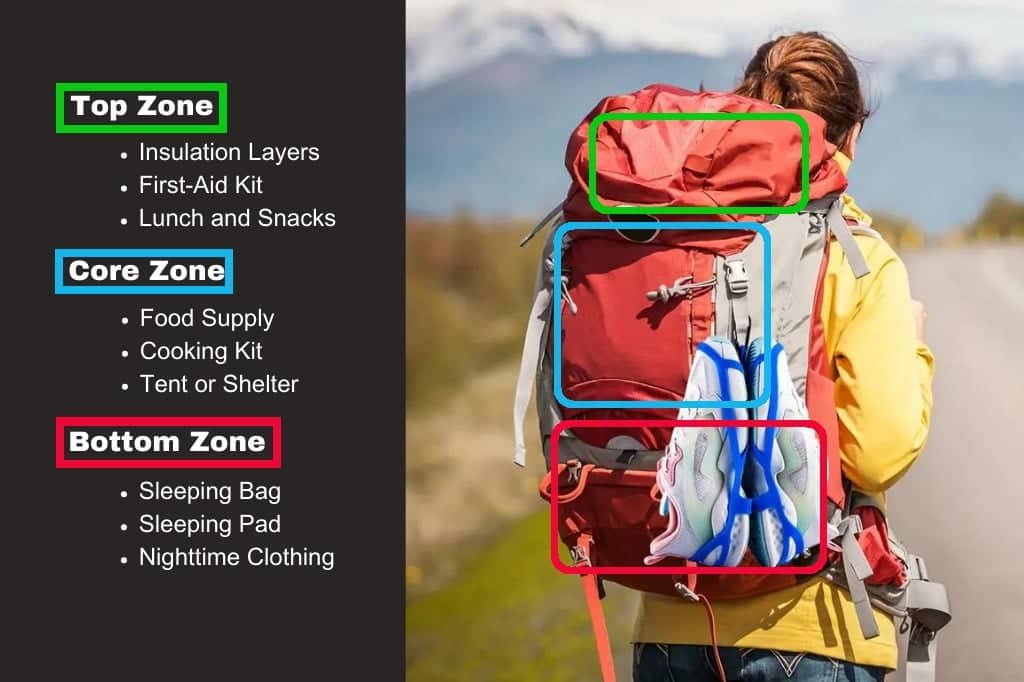
When setting out on a hike, how you organize your backpack can significantly impact your efficiency and comfort during the journey. A haphazardly packed bag can lead to constant stops, wasted energy, and unnecessary strain. Instead, think of your backpack as a storage unit divided into three strategic zones. Each zone has a specific purpose, designed to optimize balance and accessibility. Here’s a breakdown:
Top Zone (items needed occasionally)
This section is perfect for items you won’t need all the time but might need to access during the day without diving too deep into your pack.
Insulation layers: Weather can be unpredictable, especially at higher altitudes. Keeping fleece or a down jacket at the top ensures you can quickly layer up if temperatures drop or winds pick up.
First-aid kit: While we hope never to need it, a first-aid kit should always be within easy reach. Quick access can make all the difference in emergencies, from treating a minor cut to more significant issues.
Lunch and snacks: No need to halt and unpack everything for a quick bite. Keeping your lunch and some energy-boosting snacks in the top zone allows you to refuel on the go, maintaining your pace and momentum.
Core Zone (bulky but lightweight items)
Think of the core zone as the heart of your pack. It should be packed with items that are relatively lightweight to prevent straining your back but take up a lot of space.
Food supply: If you’re on a multi-day trek, your food supply for subsequent days (not today’s meals) should be packed here. They remain secure and won’t be accessed until the next meal prep.
Cooking kit: Nested pots, stoves, and fuel can be stashed in this zone. Since you’ll only need them during meal times, they don’t have to be super accessible.
Tent or shelter: For those longer trips, a tent or other shelter equipment, excluding the poles (which are often attached to the outside of the pack), should be packed in the core zone. It provides structure to your backpack and remains centered until you make camp.
Bottom Zone (items needed at the end of the day)
This zone is reserved for things you’ll only need when you’ve reached your destination for the day.
Sleeping bag: Since it’s one of the bulkiest items but used only at night, it makes sense to place it at the bottom. Many backpacks have a separate compartment for sleeping bags.
Sleeping pad: If not attached outside, the sleeping pad can be placed below, ready to cushion your rest after a long day.
Nighttime clothing: After a day of hiking, there’s nothing like changing into a fresh set of clothes. Keeping your nighttime clothing at the bottom ensures it remains dry and clean, providing comfort and warmth during your well-deserved rest.
Read Also: What is the Longest Hiking Trail in North America
Accessory Pockets and Outer Attachments

Beyond the main compartments of your backpack, the little nooks, crannies, and attachments play a vital role in your hiking experience. These spaces allow you to organize gear strategically, ensuring that essentials are readily available without digging through the entirety of your pack.
Side Pockets:
Perfect for those items you’ll want on the go.
- Water bottles: Staying hydrated is crucial. Side pockets provide easy access to your water supply, allowing you to sip without stopping.
- Compact snacks: Quick energy boosters like energy bars or nuts can be stashed here for when hunger strikes.
- Small gear: Things like multi-tools or headlamps can find a home inside pockets for easy reach.
Lid or Brain Pockets:
Often located on the top flap of your backpack, these are great for items you might need to access quickly.
- Map and compass: Essential for navigation, especially in unfamiliar terrains.
- Sunglasses: Protect your eyes when the sun is shining, and store them quickly when it’s not.
- Other quick-access items: Think about items like sunscreen, lip balm, or insect repellent.
Front Pocket:
This is often a larger, flat pocket on the very front of your pack.
- Rain jacket: Weather can change in an instant. Keeping a rain jacket here allows you to quickly adapt.
- Toilet items: Things like tissues, sanitizers, or a compact trowel can be kept for sanitary stops.
- Other essentials: Any other items that you may need to reach for without delving deep into your bag.
Outer Attachments:
These are external loops or straps on your backpack.
- Trekking poles: When not in use, they can be securely attached to the outside of your pack.
- Tent poles: Often too long to fit inside, these can be strapped securely outside.
- Larger tools: Items like a camping axe or larger tools can be fastened safely using outer attachments.
Packing Principles
Packing a backpack might seem straightforward, but adhering to specific principles ensures maximum comfort, efficiency, and functionality.
Balancing Weight:
- The key is a low and centered center of gravity. A backpack that’s too top-heavy can pull you backward, causing strain. Distribute weight so the heaviest items are centered and closest to your back.
Efficient Use of Space:
- Roll your clothing instead of folding it. This can save a considerable amount of space and reduce wrinkles.
- Use compression sacks. They can significantly reduce the volume of items like sleeping bags or down jackets, making more room in your pack.
Accessibility:
- Think about when you’ll need each item and prioritize based on usage frequency. Essentials should be within easy reach, while less frequently used items can be packed deeper.
Waterproofing:
Nature is unpredictable. Ensure your gear stays dry by:
- Use pack liners inside your backpack.
- Covering your pack with rain covers during downpours.
- Storing sensitive items in dry sacks for an extra layer of protection.
Also Read: How to Pack a Hiking Backpack
Hydration Considerations
Staying hydrated is one of the most critical aspects of any physical activity, especially during prolonged exertions like hiking. Here’s how you can ensure you always have a sip when you need it.
Hydration Bladders vs. Water Bottles:
Hydration bladders are flexible reservoirs that fit into a sleeve in your backpack and feature a hose for easy sipping. They’re excellent for hands-free hydration and can typically store more water than a bottle. However, they can be a bit challenging to refill and clean.
Water bottles are the traditional choice. They’re durable, easy to refill, and can be stored in side pockets for quick access. The downside is that they might encourage less frequent sipping as they require one to pull them out and put them back.
Tips for Avoiding Leaks Inside Your Pack:
- Always ensure the caps of water bottles or the seals of hydration bladders are tightly secured.
- Consider storing water containers in an external pocket or compartment, so even if they leak, the rest of your gear remains dry.
- Regularly inspect your hydration bladder for any signs of wear or damage.
Importance of Easy Access to Hydration:
Dehydration can lead to various problems, from reduced stamina to severe health risks. Having water within easy reach encourages regular drinking, ensuring you stay hydrated throughout your journey.
Food Packing Tips

What you eat while hiking can determine your energy levels and overall trail experience. Here are some guidelines to keep you well-fueled:
Opting for lightweight, high-energy foods: Foods like trail mix, protein bars, and dried fruits offer a significant energy punch without much weight. They’re easy to carry and can provide the vital energy spikes needed during strenuous parts of your hike.
Using resealable bags for portioning and reducing waste: Pre-portion your meals and snacks. It helps in rationing your food supply and reduces the time and hassle during meal prep. Resealable bags are also great as they minimize waste and can be used to pack out trash.
Keeping perishables cool and safe: If you’re carrying perishable items, consider using freeze packs. Start with the food frozen; it’ll thaw by the time you need it. Keep perishables in the center of your pack, where they’re insulated by other items.
Know More: How to Get to Havasu Falls without Hiking
Leave No Trace
Respecting nature is a hiker’s responsibility. The wilderness is a shared space, and preserving its beauty and integrity is paramount.
Packing out Trash:
Whatever you bring in, you must take out. Whether it’s food wrappers, used tissues, or broken gear, ensure you pack out all your trash.
Storing Food Properly to Avoid Wildlife Encounters:
Wildlife can be attracted to your food. Use bear canisters or hang your food supply from a tree to ensure animals can’t access it. This not only protects your food but also ensures animals don’t become reliant on human food sources.
Considerations for Minimizing Environmental Impact:
- Stick to designated trails to avoid harming native vegetation.
- Camp at least 200 feet away from lakes and streams to protect riparian areas.
- Always follow fire restrictions and guidelines, ensuring campfires are fully extinguished before leaving.
Final Checklist & Review
Before you hit the trail, a final review of your backpack is a wise move. This ensures that nothing essential is left behind and you’re set for a comfortable journey.
Ensuring all Essentials are Packed: The “Ten Essentials” for Survival:
Over time, hikers have identified a list of must-haves known as the “Ten Essentials.” They include:
- Navigation tools (map and compass).
- Sun protection (sunglasses, sunscreen).
- Insulation (extra clothing layers).
- Illumination (headlamp or flashlight).
- First-aid supplies.
- Fire-starting tools (waterproof matches, lighter).
- Repair tools and kits (like a multi-tool or knife).
- Nutrition (extra food).
- Hydration (extra water or water purification tablets).
- Shelter (emergency shelter or tent).
These items serve as a backbone for survival and should be a part of every hiker’s inventory, regardless of the journey’s length.
Adjusting Straps and Ensuring a Comfortable Fit:
Once everything’s inside, put it in your backpack. Adjust the shoulder, hip, and chest straps to ensure the pack sits comfortably and snugly against your body. Remember, a well-fitted backpack distributes weight efficiently, reducing the chance of strain or discomfort.
Double-checking weight distribution:
Give your backpack a gentle shake. If it feels off-balance, you might need to rearrange some items. Aim for the heaviest items to be centered and close to your back to ensure stability.
You Can Read: How Should Hiking Boots Fit
Conclusion
The joy of a well-packed backpack is something every hiker can attest to. It’s not just about organization; it’s about the freedom to enjoy the trail without being bogged down by discomfort or the nagging thought that you’ve forgotten something vital.
Every time you venture out, the way you pack your backpack can play a pivotal role in the experience you have. A well-organized, balanced pack means you can focus on the beauty around you, the rhythm of your steps, and the exhilarating feeling of being one with nature.
We encourage every hiker, whether a newbie or seasoned trekker, to give thought to their packing. Not only does it ensure a safe and enjoyable hiking experience, but it also serves as a nod of respect to the great outdoors — a place we all cherish and vow to protect. Safe travels and happy trails!


[…] Read Also: How to Pack a Backpack for Hiking […]
Comments are closed.